Difference between revisions of "AWPODC"
(→Table of contents) |
(→User Guide) |
||
| Line 137: | Line 137: | ||
|} | |} | ||
| − | + | <u>System requirements</u> | |
Fortran 90 compiler   C compiler   MPI Library | Fortran 90 compiler   C compiler   MPI Library | ||
Revision as of 17:06, 16 February 2016
Contents
- 1 Anelastic Wave Propagation (AWP-ODC)
- 1.1 Background
- 1.2 Numerical Methods
- 1.3 User Guide
- 1.3.1 Distribution contents
- 1.3.2 Installation instructions
- 1.3.3 Running instructions
- 1.3.4 Running in dynamic rupture mode
- 1.3.5 Running in wave propagation mode
- 1.3.6 Parameter file
- 1.3.7 Parameter constraints
- 1.3.8 Parameter descriptions
- 1.3.9 Source file
- 1.3.10 Source partitioning
- 1.3.11 Source file partitioning instructions
- 1.3.12 Mesh file
- 1.3.13 Mesh partitioning
- 1.3.14 Mesh file partitioning instructions
- 1.3.15 I/O control
- 1.3.16 Lustre file system
Anelastic Wave Propagation (AWP-ODC)
Background
The Anelastic Wave Propagation, AWP-ODC, independently simulates the dynamic rupture and wave propagation that occurs during an earthquake. Dynamic rupture produces friction, traction, slip, and slip rate information on the fault. The moment function is constructed from this fault data and used to initialize wave propagation.
A staggered-grid finite difference scheme is used to approximate the 3D velocity-stress elastodynamic equations. The user can has the choice of modeling dynamic rupture with either the Stress Glut (SG) or the Staggered Grid Split Node (SGSN) method. The user has the choice of two external boundary conditions that minimize artificial reflections back into the computational domain: the absorbing boundary conditions (ABC) of Cerjan and the Perfectly Matched Layers (PML) of Berenger.
AWP-ODC has been written in Fortran 77 and Fortran 90. The Message Passing Interface enables parallel computation (MPI-2) and parallel I/O (MPI-IO).
For questions about the code, please contact authors: Dr. Kim Olsen of SDSU (kolsen_at_geology_dot_sdsu_dot_edu), Dr. Steven Day of SDSU (day_at_moho_dot_sdsu_dot_edu) or Dr. Yifeng Cui of SDSC (yfcui_at_sdsc_dot_edu).
REFERENCES
Olsen, K.B.,"Simulation of three dimensional wave propagation in the Salt Lake Basin," Ph.D. thesis, The University of Utah, Salt Lake City, Utah, 1994.
Olsen, K.B., R.J. Archuleta, and J. Matarese, "Three-dimensional simulation of a magnitude 7.75 earthquake on the San Andreas fault," Science, vol. 270, pp.1628-1632i, 1995.
Marcinkovich, C., Olsen K.B., "On the implementation of perfectly matched layers in a 3D fourth-order velocity-stress finite-difference scheme", J Geophys Res., vol. 108, no. B(5), 2276, doi10.1029/ 2002JB002235, 2003.
Olsen, K.B., S.M. Day, and C.R. Bradley, "Estimation of Q for long- period (>2 s) waves in the Los Angeles Basin," Bull. Seis. Soc. Am., vol. 93, no. 2, pp.627-638, 2003.
Dalguer, L.A. and S.M. Day, "Staggered-Grid Split-Node method for spontaneous rupture simulation," J. Geophys. Red., vol. 112, B02302, 2007.
Cui, Y., A. Chourasia, R. Moore, K.B. Olsen, P. Maechling, and T.H. Jordan, "The TeraShake computational platform for large-scale earthquake simulations," Advances in Geocomputing: Lecture Notes in Earth Science, vol. 119, Berlin/Heidelberg: Springer-Verlag, pp.229-278, 2009.
Cui, Y., K.B. Olsen, T.H. Jordan, K. Lee, J. Zhou, P. Small, G. Ely, D. Roten, D.K. Panda, J. Levesque, S.M. Day, P. Maechling, "Scalable earthquake simulation on petascale supercomputers," submitted to SC10, New Orleans, LA, Nov. 2010.
Numerical Methods
Governing equations
AWP-ODC models an earthquake as a shear crack on an imbedded surface in a linearly elastic medium. As a result, the code simulates an earthquake with the following 3D velocity-stress elastodynamic equations:
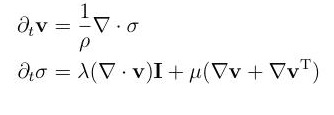
where
are the velocity vector and stress tensor respectively. The material density and Lamé coeffcients are denoted
The coupled PDEs are broken up into 9 scalar wave equations and approximated with finite differences.
Staggered-grid finite difference method
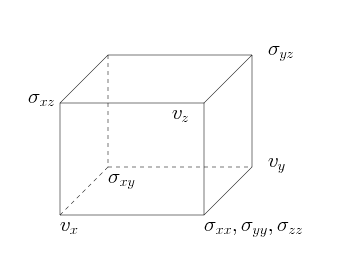
In a staggered-grid finite difference scheme, each vertex of given cell tracks specific data. Remaining information is provided by neighboring cells. To the right is an illustration of how the 9 pieces of data are distributed among the cell vertices.
The finite difference scheme is second order accurate in time and fourth order accurate in space. Time derivatives are approximated with the following difference equations:
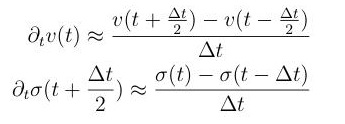
while spatial derivatives are approximated by

Φ denotes an arbitrary stress or velocity component and c1 = 9/8, c2 = -1/24.
External boundary conditions
Wave propagation simulation requires special external boundary conditions. Truncating the physical domain to a feasible size introduces artifical reflections back into the computational region. To prevent such reflections, AWP-ODC allows the user to choose between absorbing boundary conditions (ABC) or perfectly matched layers (PML).
ABCs explicitly damp waves heading toward the external boundary. PML approaches instead solve an auxilliary set of wave equations near the external boundaries. Although PMLs generally work well, they may suffer from instabilities. In this case, ABCs are a good way to go.
There are many ways to implement PML. AWP-ODC applies an operator splitting approach. Consider easterly wave propagation. The following system of PDEs are derived by decomposing the gradient and divergence operators into normal and tangential components with respect to the propagation direction.
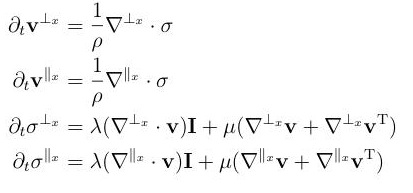
To attenuate reflections, damping is added to the normal components of stress and velocity. With this addition, the first and third equations become the following:

Staggered-grid split node method
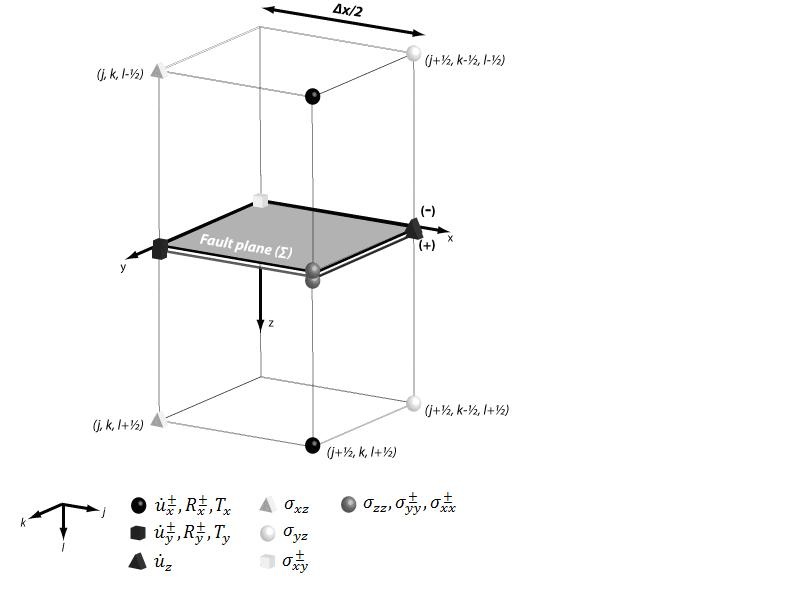
The SGSN method adapts the staggered-grid finite difference scheme to dynamic rupture simulations. Split nodes are introduced on the fault to deal with velocity and stress discontinuities. Spatial derivative approximation depends on a given point's distance from the fault plane. To the right is a representation of SGSN finite difference cells meeting at the fault plane.
If j0 denotes the fault plane, the SGSN finite difference equations are

User Guide
Distribution contents
/src/
|
Source code |
/bin/
|
sample run scripts |
/utilities/
|
pre- and post-processing tools |
/setting/
|
IN3D parameter files |
/examples/
|
small scale tests |
/doc/
|
documents |
System requirements
Fortran 90 compiler   C compiler   MPI Library
Installation instructions
To install AWP-ODC, perform the following steps:Â Â $ tar -xvf AWPODC.tarThe executable
  $ cd AWPODC/src
  $ make -f makefile.MACHINE (e.g. ranger,kraken,jaguar)pmcl3dshould be insrc/and inbin/.
Default configuration is 64-bit. To build a 32-bit conversion, perform the following steps:
1. Locate the following 3 line block of code insrc/memory.f  integer,parameter :: i8 = selected_int_kind(10)2. Comment out the first line and uncomment the third line.
  c On 32-bit machine, using
  c integer,parameter :: i8 = selected_int_kind(7)
Running instructions
1. Unpack tarball as described in installation instructions.
2. Create a job submission directory in/AWPODC/directory. This directory will be called/run/in these instructions.  $ mkdir AWPODC/run3. Put copy (or softlink) ofpmcl3din/run/directory.
  copy  Â$ cp AWPODC/bin/pmcl3d AWPODC/run/pmcl3d
  softlink  Â$ ln -s AWPODC/bin/pmcl3d AWPODC/run/pmcl3d
4. Put copy (or softlink) ofpre-runscript in/run/directory.
  copy  Â$ cp AWPODC/utilities/pre-run AWPODC/run/pre-run
  softlink  Â$ ln -s AWPODC/utilities/pre-run AWPODC/run/pre-run
5. Executepre-runscript from/run/directory to generate output folders.  $ cd AWPODC/run6. If the simulation does not require partitioned mesh and/or source files, create an input directory and put the single mesh/source files there. In these instructions, the directory will be called
  $ ./pre-run/input/.  $ mkdir inputIf the simulation does use partitioned mesh and/or source files, they must be placed in the/input_rst/directory. This directory is created by thepre-runscript. The directory structure for/input_rst/includes subdirectories for mesh and source files. Please consult/utilities/MeshPartitionerand/utilities/SourcePartitionerfor more information.
7. ConfigureIN3Dparameter file to problem specifications in/run/directory. If necessary, useIN3Dfiles from the/setting/directory for reference. TheIN3Dfile, among other things, specifies the simulation type. It also specifies input/output file locations.
8. Configure platform dependent run script in/run/directory. If necessary, use run scripts from/bin/directory for reference.
9. Submit job from/run/directory. Like the run script, the job submission process is platform dependent. On Kraken, for instance, therun.krakenscript found in/bin/is submitted via  $ qsub run.kraken
Running in dynamic rupture mode
Follow the general running instructions above. Once the source/mesh file(s) are placed in appropriate locations, choose the following values inIN3D.
1. SetIFAULT= 3,4. (look at "Mesh file processing" below)
2. SetIDYNA= 0 (sg mode) orIDYNA= 1 (sgsn mode).
Running in wave propagation mode
Follow the general running instructions above. Once the source/mesh file(s) are placed in appropriate locations, choose the following values in IN3D.
1. SetIFAULT= 0,1,2. (look at "Source file processing" below)
Parameter file
The parameters in the IN3D file control all aspects of the simulation including
  Size of computational domain
  Simulation time
  MPI domain decomposition
  Boundary conditions (Cerjan or PML)
  Source file(s) processing
  Mesh file(s) processing
  I/O behavior
  Input file and output file locations
among other things. The uses of most of the parameters are self explanatory and descriptions may be found in anIN3Dfile. Parameters that determine mesh file processing, source file processing, and I/O behavior warrant further description.
Parameter constraints
Obeying the following parameter constraints is key to running a successful simulation
 ÂNPC=0 is Cerjan,NPC=1 is PML
 ÂNW/NPWmust be integer (W = X,Y,Z)
  WhenNPC=1,NW/NPW>ND(W = X,Y,Z)
  WhenNPC=1,ND<=20, whenNPC=0,ND>=20
  WhenNPC=1, 3 <=ARBC<= 4, whenNPC=0, 0.90 <=ARBC<= 0.95
 Â(npx*npy*npz)/IOST <total number of OSTs in a file system
Parameter descriptions
Below is a list and description of the IN3D parameters that require brief description. For more parameter information, please consult anyIN3Dfile. Again, more complicated parameters such asMEDIARESTARTamdIFAULTwill be discussed later.
CHECKPOINT
|
Timestep increments at which all variables will be saved. (e.g. CHECKPOINT = 10000 means data will be saved at every ten thousandth timestep). Data backup is useful in the event of a system crash. Checkpoint files placed in /output_ckp/.
|
PERF-MEAS
|
Performance measure option 0 = off , 1 = on When on, simulation data including initialization time, computation time per time step, MPI-IO time, simulation time written to file. |
READSTEP
|
The number of timesteps read when reading source file. |
SOCALQ
|
Flag only used for San Andreas Fault event. Ensures stability. 0 = off , 1 = on |
PHT
|
Damping parameter used in PML |
Source file
IFAULT controls the method of reading the source file(s), the type of simulation to run, and what data to output.
Dynamic rupture and wave propagation are initialized with different data. Dynamic rupture begins with initial stress along the fault. Wave propagation uses the moment function built from post processed slip rate data. Below is a table describing IFAULT options.
IFAULT
|
Source read | Simulation type | Output |
|---|---|---|---|
| 0 | serially read 1 file (text) | wave propagation, small scale | wave velocity (surface and/or volume) |
| 1 | serially read 1 file (binary), write partitioned files (binary) | wave propagation, small scale | wave velocity (surface and/or volume) |
| 2 | serially read partitioned files (binary) | wave propagation, large scale | wave velocity (surface and/or volume) |
| 3 | serially read initial stress at fault (text) | dynamic rupture | dynamic outputs |
| 4 | same as IFAULT = 3
|
same as IFAULT = 3
|
dynamic outputs, wave velocity (surface) |
For IFAULT = 0,1,2 the user can select to write only surface velocity or both surface and volume velocity. If the parameter ISFCVLM = 0, only surface velocity is written. When ISFCVLM = 1, both volume and surface velocity are written. When IFAULT = 4, only surface velocity can be written. Surfaces and volumes of interest can also be specified by the user. Each direction (X,Y,Z) has 6 parameters that determine the observation resolution and observation size for surface and volume. Letting W represent the X, Y, or Z direction, the following table shows the decimation parameters associated with each value of IFAULT.
IFAULT
|
NBGW
|
NEDW
|
NSKPW
|
NBGW2
|
NEDW2
|
NSKPW2
|
|---|---|---|---|---|---|---|
| 0 | X | X | X | X | X | X |
| 1 | X | X | X | X | X | X |
| 2 | X | X | X | X | X | X |
| Surface Decimation | Volume Decimation | |||||
| 3 | X | X | X | |||
| Surface Decimation Only for W=Y
|
||||||
| 4 | X | X | X | X | X | X |
| Surface Decimation Only for W=Y
|
Surface Decimation | |||||
Source file locations in the cases IFAULT=0,1,3,4 are specified near the bottom of the IN3D file. The line
  'input/FAULTPOW'
specifies that the text based FAULTPOW file should be read from the /input directory. When IFAULT = 3, this line has no effect since partitioned files are read in from /input_rst/
Source partitioning
AWP-ODC has a source partitioner located in/utilities/SourcePartitioner. Here you will find documentation as well as all necessary scripts and routines needed to partition a source file. If you would like to try partitioning small source files, go to/examples/input/SourcePartitioning.
Running a job withIFAULT=2 requires placing partitioned source files in/input_rst/srcpart/tpsrc/. The source file location specified inIN3Dis not applicable in this case.
Source file partitioning instructions
There are also instructions at/utilities/SourcePartitioner/README.SourcePartitioner. The following instructions assume the user is in the/AWPODC/directory.
1. Make a directory to run the source partition from. It will be called/SourcePart/in this example.
 Â$ mkdir SourcePart
2. Copy (or softlink) machine independent routines from/utilities/SourcePartitionerto/SourcePart.
  (copy) Â$ cp utilities/SourcePartitioner/pre-run-srcpart SourcePart/
  (softlink) Â$ ln -s utilities/SourcePartitioner/pre-run-srcpart SourcePart/
3. Type the following commands to obtain the source partitioner executable. (MACHINE =kraken,ranger, or triton)Â Â $ cd SourcePart4. Execute
  $ pushd $PWD
  $ cd ../utilities/SourcePartitioner
  $ ./compile_MACHINE.sh srcpart-split-mpiio-new
  $ popd
  $ ln -s ../utilities/SourcePartitioner/srcpart-split-mpiio-new srcpart-split-mpiio-newpre-run-srcpartscript in/SourcePartto obtain necessary output directories.
 Â$ ./pre-run-srcpart
5. Make a batch script for job submission. Sample scripts for Kraken and Ranger may be found in/utilities/SourcePartitioner.
6. Once the job has completed, the partitioned mesh files are in/SourcePart/srcpart. To run a simulation with these files, they must be placed in the running directory,/run/, described in previous instructions. Create a copy of/SourcePart/srcpartin/run/input_rst.
Mesh file
The parameterMEDIARESTARTcontrols how the mesh file is read in. Currently, the user has 5 options to choose from
MEDIARESTART
|
Description | Uses |
| 0 | create homogeneous mesh | fast initialization, small scale |
| 1 | serially read 1 file | small scale |
| 2 | MPI-IO to read 1 file
|
large scale |
| 3 | serial read of partitioned files | large scale |
| 4 | serially read post-processed partitioned files | large scale |
NVAR specifies the number of variables for each grid point in a mesh file.
There are three different cases.
NVAR Value
|
ACT_NVAR
|
Variables |
| 3 | 3 | [vp,vs,dd] |
| 5 | 5 | [vp,vs,dd,pq,sq] |
| 8 | 5 | [x,y,z,vp,vs,dd,pq,sq] |
Memory limitations for large-scale simulationsmake it necessary to partition in the x direction when MEDIARESTART = 2. The following constraints must be placed on the partitioning:
  1. real(nx*ny*(nvar act_nvar)*4)/real(PARTDEG) < MEMORY SIZE
  2. npy should be divisible by partdeg and npx*npy*npz >= nz*PARTDEG
  3. npy and ny >= PARTDEG
  4. npx*npy*npz > nz*PARTDEG
To check that these constraints are satisfied, run /utilities/vcheck from the /run/ directory.
Mesh partitioning
AWP-ODC has a mesh partitioner located in/utilities/MeshPartitioner. Here you will find documentation as well as all necessary scripts and routines needed to partition a mesh file. If you would like to try partitioning small mesh files, go to/examples/input/MeshPartitioning. Running a job withMEDIARESTART=3,4 requires placing partitioned mesh files in/input_rst/mediapart. The mesh file location specified inIN3Dis not applicable in this case.
Mesh file partitioning instructions
There are also instructions at/utilities/MeshPartitioner/README.MeshPartitioner. The following instructions assume the user is in the/AWPODCdirectory.
1. Make a directory to run the mesh partition from. It will be called/MeshPart/in this example.
 Â$ mkdir MeshPart
2. Copy (or softlink) machine independent routines from/utilities/MeshPartitionerto/MeshPart.
  (copy) Â$ cp utilities/MeshPartitioner/pre-run-meshpart MeshPart/
  (softlink) Â$ ln -s utilities/MeshPartitioner/pre-run-meshpart MeshPart/
3. Type the following commands to obtain the source partitioner executable. (MACHINE =kraken,ranger,ortriton)
 Â$ cd MeshPart
 Â$ pushd $PWD
 Â$ cd ../utilities/MeshPartitioner
 Â$ ./compile_MACHINE.sh part-parallel-nvar
 Â$ popd
 Â$ ln -s ../utilities/MeshPartitioner/part-parallel-nvar part-parallel-nvar
4. Executepre-run-meshpartscript in/MeshPartto obtain necessary output directories.
 Â$ ./pre-run-meshpart
5. Make a batch script for job submission. Sample scripts for Kraken and Ranger may be found in/utilities/MeshPartitioner.
6. Once the job has completed, the partitioned mesh files are in/MeshPart/meshpart. To run a simulation with these files, they must be placed in the running directory,/run, described in previous instructions. Create a copy of/MeshPart/meshpartin/run/input_rst.
I/O control
IO_OPT enables or disables data output. The user has complete control of how much simulation data should be stored, how much of the computational domain should be sampled, and how often this stored data is written to file. NTISKP (NTISKP2) specify how many timesteps to skip when recording simulation data. Default values for both parameters are 1.
| Parameter | Use |
|---|---|
NTISKP
|
wave propagation surface velocity output, dynamic rupture |
NTISKP2
|
wave propagation volume velocity output, surface velocity output when IFAULT=4
|
For example, if NTISKP = 5, relevant data is recorded every 5 timesteps and stored in temporary buffers. WRITE_STEP (WRITE_STEP2) determines how often buffered data is written to output files. Default values for both parameters are 1.
| Parameter | Use |
|---|---|
WRITE_STEP
|
wave propagation mode surface surface velocity output, dynamic rupture mode |
WRITE_STEP2
|
wave propagation mode volume velocity output, surface velocity output when IFAULT=4 mode
|
NTISKP (NTISKP2) and WRITE_STEP (WRITE_STEP2) together determine how often file writing is performed. Output file(s) is(are) accessed every NTISKP*WRITE_STEP timesteps or NTISKP2*WRITE_STEP2 timesteps, depending on the value of IFAULT. IVELOCITY determines whether one single output file is generated, or whether many files are created.
IVELOCITY
|
Meaning |
| 0 | data aggregation |
| 1 | 1 output file per NTISKP*WRITE_STEP timestepsand/or 1 output file per NTISKP2*WRITE_STEP2
|
Lustre file system
The Lustre file system provides a means of parallelizing sequential I/O operations, called file striping. File striping distributes reading and writing operations across multiple Object Storage Targets (OSTs). In AWP-ODC, multiple OSTs can be utilized for file checkpointing and mesh reading.
IOST specifies the number of reading processors in MEDIARESTART = 3 and the number of reading/writing processors when checkpointing is enabled. In general, (npx*npy*npz)/IOST < total number of OSTs in a file system.
